


- 可输入一个产品的OE编码或者参考编码
- 如:本田雅阁减振器,标致307刹车片 (支持拼音)
- 例如:可输入厂商电话、联系人、地址、公司名等
- 首页
- 第三方数据
- ÜRO PARTS
- 1C0945511A
第三方数据ÜRO PARTS : 1C0945511A
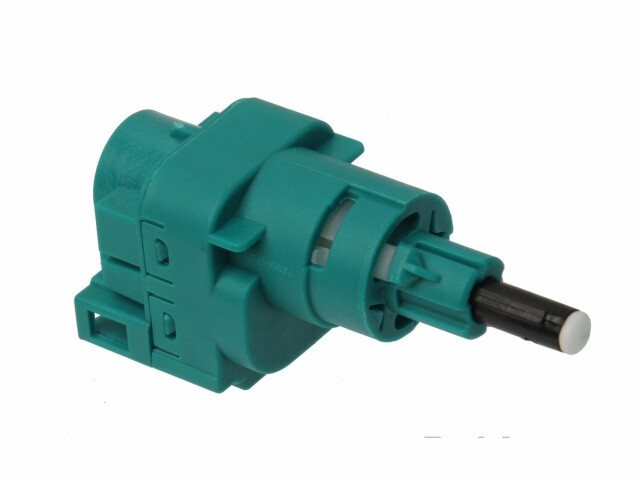
Brake Light Switch
ÜRO PARTS : 1C0945511A
适用车型
 VOLKSWAGEN
BEETLE
1.8L L4 Turbocharged
VOLKSWAGEN
BEETLE
1.8L L4 Turbocharged
 2002 2002 |
4-Pin; Special care must be taken during installation to prevent damage and obtain proper electrical contact; Prior to installation pull plunger to full extension, use and apply lubricant to plunger. Keep pedal in up position.; Push switch in and seat into opening pressing against pedal. Once seated secure switch by turning it to the right approximately 45 degrees.; This action turns the plunger shoe into the correct position to make contacts operate. 1J0945511A, 1J0945511B, 1J0945511D, URO012812 |
| 2003 |
4-Pin; Special care must be taken during installation to prevent damage and obtain proper electrical contact; Prior to installation pull plunger to full extension, use and apply lubricant to plunger. Keep pedal in up position.; Push switch in and seat into opening pressing against pedal. Once seated secure switch by turning it to the right approximately 45 degrees.; This action turns the plunger shoe into the correct position to make contacts operate. 1J0945511A, 1J0945511B, 1J0945511D, URO012812 |
| 2004 |
4-Pin; Special care must be taken during installation to prevent damage and obtain proper electrical contact; Prior to installation pull plunger to full extension, use and apply lubricant to plunger. Keep pedal in up position.; Push switch in and seat into opening pressing against pedal. Once seated secure switch by turning it to the right approximately 45 degrees.; This action turns the plunger shoe into the correct position to make contacts operate. 1J0945511A, 1J0945511B, 1J0945511D, URO012812 |
| 2005 |
4-Pin; Special care must be taken during installation to prevent damage and obtain proper electrical contact; Prior to installation pull plunger to full extension, use and apply lubricant to plunger. Keep pedal in up position.; Push switch in and seat into opening pressing against pedal. Once seated secure switch by turning it to the right approximately 45 degrees.; This action turns the plunger shoe into the correct position to make contacts operate. 1J0945511A, 1J0945511B, 1J0945511D, URO012812 |
1.9L L4 DIESEL Turbocharged
| 2002 |
4-Pin; Special care must be taken during installation to prevent damage and obtain proper electrical contact; Prior to installation pull plunger to full extension, use and apply lubricant to plunger. Keep pedal in up position.; Push switch in and seat into opening pressing against pedal. Once seated secure switch by turning it to the right approximately 45 degrees.; This action turns the plunger shoe into the correct position to make contacts operate. 1J0945511A, 1J0945511B, 1J0945511D, URO012812 |
| 2003 |
4-Pin; Special care must be taken during installation to prevent damage and obtain proper electrical contact; Prior to installation pull plunger to full extension, use and apply lubricant to plunger. Keep pedal in up position.; Push switch in and seat into opening pressing against pedal. Once seated secure switch by turning it to the right approximately 45 degrees.; This action turns the plunger shoe into the correct position to make contacts operate. 1J0945511A, 1J0945511B, 1J0945511D, URO012812 |
| 2004 |
4-Pin; Special care must be taken during installation to prevent damage and obtain proper electrical contact; Prior to installation pull plunger to full extension, use and apply lubricant to plunger. Keep pedal in up position.; Push switch in and seat into opening pressing against pedal. Once seated secure switch by turning it to the right approximately 45 degrees.; This action turns the plunger shoe into the correct position to make contacts operate. 1J0945511A, 1J0945511B, 1J0945511D, URO012812 |
| 2005 |
4-Pin; Special care must be taken during installation to prevent damage and obtain proper electrical contact; Prior to installation pull plunger to full extension, use and apply lubricant to plunger. Keep pedal in up position.; Push switch in and seat into opening pressing against pedal. Once seated secure switch by turning it to the right approximately 45 degrees.; This action turns the plunger shoe into the correct position to make contacts operate. 1J0945511A, 1J0945511B, 1J0945511D, URO012812 |
| 2006 |
4-Pin; Special care must be taken during installation to prevent damage and obtain proper electrical contact; Prior to installation pull plunger to full extension, use and apply lubricant to plunger. Keep pedal in up position.; Push switch in and seat into opening pressing against pedal. Once seated secure switch by turning it to the right approximately 45 degrees.; This action turns the plunger shoe into the correct position to make contacts operate. 1J0945511A, 1J0945511B, 1J0945511D, URO012812 |
2.0L L4
| 2007 |
4-Pin; Special care must be taken during installation to prevent damage and obtain proper electrical contact; Prior to installation pull plunger to full extension, use and apply lubricant to plunger. Keep pedal in up position.; Push switch in and seat into opening pressing against pedal. Once seated secure switch by turning it to the right approximately 45 degrees.; This action turns the plunger shoe into the correct position to make contacts operate. 1J0945511A, 1J0945511B, 1J0945511D, URO012812 |
2.0L L4 DOHC
| 2008 |
4-Pin; Special care must be taken during installation to prevent damage and obtain proper electrical contact; Prior to installation pull plunger to full extension, use and apply lubricant to plunger. Keep pedal in up position.; Push switch in and seat into opening pressing against pedal. Once seated secure switch by turning it to the right approximately 45 degrees.; This action turns the plunger shoe into the correct position to make contacts operate. 1J0945511A, 1J0945511B, 1J0945511D, URO012812 |
2.0L L4 SOHC
| 2002 |
4-Pin; Special care must be taken during installation to prevent damage and obtain proper electrical contact; Prior to installation pull plunger to full extension, use and apply lubricant to plunger. Keep pedal in up position.; Push switch in and seat into opening pressing against pedal. Once seated secure switch by turning it to the right approximately 45 degrees.; This action turns the plunger shoe into the correct position to make contacts operate. 1J0945511A, 1J0945511B, 1J0945511D, URO012812 |
| 2003 |
4-Pin; Special care must be taken during installation to prevent damage and obtain proper electrical contact; Prior to installation pull plunger to full extension, use and apply lubricant to plunger. Keep pedal in up position.; Push switch in and seat into opening pressing against pedal. Once seated secure switch by turning it to the right approximately 45 degrees.; This action turns the plunger shoe into the correct position to make contacts operate. 1J0945511A, 1J0945511B, 1J0945511D, URO012812 |
| 2004 |
4-Pin; Special care must be taken during installation to prevent damage and obtain proper electrical contact; Prior to installation pull plunger to full extension, use and apply lubricant to plunger. Keep pedal in up position.; Push switch in and seat into opening pressing against pedal. Once seated secure switch by turning it to the right approximately 45 degrees.; This action turns the plunger shoe into the correct position to make contacts operate. 1J0945511A, 1J0945511B, 1J0945511D, URO012812 |
| 2005 |
4-Pin; Special care must be taken during installation to prevent damage and obtain proper electrical contact; Prior to installation pull plunger to full extension, use and apply lubricant to plunger. Keep pedal in up position.; Push switch in and seat into opening pressing against pedal. Once seated secure switch by turning it to the right approximately 45 degrees.; This action turns the plunger shoe into the correct position to make contacts operate. 1J0945511A, 1J0945511B, 1J0945511D, URO012812 |
| 2006 |
4-Pin; Special care must be taken during installation to prevent damage and obtain proper electrical contact; Prior to installation pull plunger to full extension, use and apply lubricant to plunger. Keep pedal in up position.; Push switch in and seat into opening pressing against pedal. Once seated secure switch by turning it to the right approximately 45 degrees.; This action turns the plunger shoe into the correct position to make contacts operate. 1J0945511A, 1J0945511B, 1J0945511D, URO012812 |
| 2008 |
4-Pin; Special care must be taken during installation to prevent damage and obtain proper electrical contact; Prior to installation pull plunger to full extension, use and apply lubricant to plunger. Keep pedal in up position.; Push switch in and seat into opening pressing against pedal. Once seated secure switch by turning it to the right approximately 45 degrees.; This action turns the plunger shoe into the correct position to make contacts operate. 1J0945511A, 1J0945511B, 1J0945511D, URO012812 |
2.5L L5
| 2006 |
4-Pin; Special care must be taken during installation to prevent damage and obtain proper electrical contact; Prior to installation pull plunger to full extension, use and apply lubricant to plunger. Keep pedal in up position.; Push switch in and seat into opening pressing against pedal. Once seated secure switch by turning it to the right approximately 45 degrees.; This action turns the plunger shoe into the correct position to make contacts operate. 1J0945511A, 1J0945511B, 1J0945511D, URO012812 |
| 2007 |
4-Pin; Special care must be taken during installation to prevent damage and obtain proper electrical contact; Prior to installation pull plunger to full extension, use and apply lubricant to plunger. Keep pedal in up position.; Push switch in and seat into opening pressing against pedal. Once seated secure switch by turning it to the right approximately 45 degrees.; This action turns the plunger shoe into the correct position to make contacts operate. 1J0945511A, 1J0945511B, 1J0945511D, URO012812 |
| 2008 |
4-Pin; Special care must be taken during installation to prevent damage and obtain proper electrical contact; Prior to installation pull plunger to full extension, use and apply lubricant to plunger. Keep pedal in up position.; Push switch in and seat into opening pressing against pedal. Once seated secure switch by turning it to the right approximately 45 degrees.; This action turns the plunger shoe into the correct position to make contacts operate. 1J0945511A, 1J0945511B, 1J0945511D, URO012812 |
GOLF
1.8L L4 Turbocharged
| 2002 |
4-Pin; Special care must be taken during installation to prevent damage and obtain proper electrical contact; Prior to installation pull plunger to full extension, use and apply lubricant to plunger. Keep pedal in up position.; Push switch in and seat into opening pressing against pedal. Once seated secure switch by turning it to the right approximately 45 degrees.; This action turns the plunger shoe into the correct position to make contacts operate. 1J0945511A, 1J0945511B, 1J0945511D, URO012812 |
| 2003 |
4-Pin; Special care must be taken during installation to prevent damage and obtain proper electrical contact; Prior to installation pull plunger to full extension, use and apply lubricant to plunger. Keep pedal in up position.; Push switch in and seat into opening pressing against pedal. Once seated secure switch by turning it to the right approximately 45 degrees.; This action turns the plunger shoe into the correct position to make contacts operate. 1J0945511A, 1J0945511B, 1J0945511D, URO012812 |
| 2004 |
4-Pin; Special care must be taken during installation to prevent damage and obtain proper electrical contact; Prior to installation pull plunger to full extension, use and apply lubricant to plunger. Keep pedal in up position.; Push switch in and seat into opening pressing against pedal. Once seated secure switch by turning it to the right approximately 45 degrees.; This action turns the plunger shoe into the correct position to make contacts operate. 1J0945511A, 1J0945511B, 1J0945511D, URO012812 |
| 2005 |
4-Pin; Special care must be taken during installation to prevent damage and obtain proper electrical contact; Prior to installation pull plunger to full extension, use and apply lubricant to plunger. Keep pedal in up position.; Push switch in and seat into opening pressing against pedal. Once seated secure switch by turning it to the right approximately 45 degrees.; This action turns the plunger shoe into the correct position to make contacts operate. 1J0945511A, 1J0945511B, 1J0945511D, URO012812 |
| 2006 |
4-Pin; Special care must be taken during installation to prevent damage and obtain proper electrical contact; Prior to installation pull plunger to full extension, use and apply lubricant to plunger. Keep pedal in up position.; Push switch in and seat into opening pressing against pedal. Once seated secure switch by turning it to the right approximately 45 degrees.; This action turns the plunger shoe into the correct position to make contacts operate. 1J0945511A, 1J0945511B, 1J0945511D, URO012812 |
1.9L L4 DIESEL Turbocharged
| 2002 |
4-Pin; Special care must be taken during installation to prevent damage and obtain proper electrical contact; Prior to installation pull plunger to full extension, use and apply lubricant to plunger. Keep pedal in up position.; Push switch in and seat into opening pressing against pedal. Once seated secure switch by turning it to the right approximately 45 degrees.; This action turns the plunger shoe into the correct position to make contacts operate. 1J0945511A, 1J0945511B, 1J0945511D, URO012812 |
| 2003 |
4-Pin; Special care must be taken during installation to prevent damage and obtain proper electrical contact; Prior to installation pull plunger to full extension, use and apply lubricant to plunger. Keep pedal in up position.; Push switch in and seat into opening pressing against pedal. Once seated secure switch by turning it to the right approximately 45 degrees.; This action turns the plunger shoe into the correct position to make contacts operate. 1J0945511A, 1J0945511B, 1J0945511D, URO012812 |
| 2004 |
4-Pin; Special care must be taken during installation to prevent damage and obtain proper electrical contact; Prior to installation pull plunger to full extension, use and apply lubricant to plunger. Keep pedal in up position.; Push switch in and seat into opening pressing against pedal. Once seated secure switch by turning it to the right approximately 45 degrees.; This action turns the plunger shoe into the correct position to make contacts operate. 1J0945511A, 1J0945511B, 1J0945511D, URO012812 |
| 2005 |
4-Pin; Special care must be taken during installation to prevent damage and obtain proper electrical contact; Prior to installation pull plunger to full extension, use and apply lubricant to plunger. Keep pedal in up position.; Push switch in and seat into opening pressing against pedal. Once seated secure switch by turning it to the right approximately 45 degrees.; This action turns the plunger shoe into the correct position to make contacts operate. 1J0945511A, 1J0945511B, 1J0945511D, URO012812 |
| 2006 |
4-Pin; Special care must be taken during installation to prevent damage and obtain proper electrical contact; Prior to installation pull plunger to full extension, use and apply lubricant to plunger. Keep pedal in up position.; Push switch in and seat into opening pressing against pedal. Once seated secure switch by turning it to the right approximately 45 degrees.; This action turns the plunger shoe into the correct position to make contacts operate. 1J0945511A, 1J0945511B, 1J0945511D, URO012812 |
2.0L L4
| 2002 |
4-Pin; Special care must be taken during installation to prevent damage and obtain proper electrical contact; Prior to installation pull plunger to full extension, use and apply lubricant to plunger. Keep pedal in up position.; Push switch in and seat into opening pressing against pedal. Once seated secure switch by turning it to the right approximately 45 degrees.; This action turns the plunger shoe into the correct position to make contacts operate. 1J0945511A, 1J0945511B, 1J0945511D, URO012812 |
| 2003 |
4-Pin; Special care must be taken during installation to prevent damage and obtain proper electrical contact; Prior to installation pull plunger to full extension, use and apply lubricant to plunger. Keep pedal in up position.; Push switch in and seat into opening pressing against pedal. Once seated secure switch by turning it to the right approximately 45 degrees.; This action turns the plunger shoe into the correct position to make contacts operate. 1J0945511A, 1J0945511B, 1J0945511D, URO012812 |
| 2004 |
4-Pin; Special care must be taken during installation to prevent damage and obtain proper electrical contact; Prior to installation pull plunger to full extension, use and apply lubricant to plunger. Keep pedal in up position.; Push switch in and seat into opening pressing against pedal. Once seated secure switch by turning it to the right approximately 45 degrees.; This action turns the plunger shoe into the correct position to make contacts operate. 1J0945511A, 1J0945511B, 1J0945511D, URO012812 |
| 2005 |
4-Pin; Special care must be taken during installation to prevent damage and obtain proper electrical contact; Prior to installation pull plunger to full extension, use and apply lubricant to plunger. Keep pedal in up position.; Push switch in and seat into opening pressing against pedal. Once seated secure switch by turning it to the right approximately 45 degrees.; This action turns the plunger shoe into the correct position to make contacts operate. 1J0945511A, 1J0945511B, 1J0945511D, URO012812 |
| 2006 |
4-Pin; Special care must be taken during installation to prevent damage and obtain proper electrical contact; Prior to installation pull plunger to full extension, use and apply lubricant to plunger. Keep pedal in up position.; Push switch in and seat into opening pressing against pedal. Once seated secure switch by turning it to the right approximately 45 degrees.; This action turns the plunger shoe into the correct position to make contacts operate. 1J0945511A, 1J0945511B, 1J0945511D, URO012812 |
2.8L V6
| 2003 |
4-Pin; Special care must be taken during installation to prevent damage and obtain proper electrical contact; Prior to installation pull plunger to full extension, use and apply lubricant to plunger. Keep pedal in up position.; Push switch in and seat into opening pressing against pedal. Once seated secure switch by turning it to the right approximately 45 degrees.; This action turns the plunger shoe into the correct position to make contacts operate. 1J0945511A, 1J0945511B, 1J0945511D, URO012812 |
| 2004 |
4-Pin; Special care must be taken during installation to prevent damage and obtain proper electrical contact; Prior to installation pull plunger to full extension, use and apply lubricant to plunger. Keep pedal in up position.; Push switch in and seat into opening pressing against pedal. Once seated secure switch by turning it to the right approximately 45 degrees.; This action turns the plunger shoe into the correct position to make contacts operate. 1J0945511A, 1J0945511B, 1J0945511D, URO012812 |
| 2005 |
4-Pin; Special care must be taken during installation to prevent damage and obtain proper electrical contact; Prior to installation pull plunger to full extension, use and apply lubricant to plunger. Keep pedal in up position.; Push switch in and seat into opening pressing against pedal. Once seated secure switch by turning it to the right approximately 45 degrees.; This action turns the plunger shoe into the correct position to make contacts operate. 1J0945511A, 1J0945511B, 1J0945511D, URO012812 |
2.8L V6 DOHC
| 2002 |
4-Pin; Special care must be taken during installation to prevent damage and obtain proper electrical contact; Prior to installation pull plunger to full extension, use and apply lubricant to plunger. Keep pedal in up position.; Push switch in and seat into opening pressing against pedal. Once seated secure switch by turning it to the right approximately 45 degrees.; This action turns the plunger shoe into the correct position to make contacts operate. 1J0945511A, 1J0945511B, 1J0945511D, URO012812 |
2.8L V6 SOHC
| 2002 |
4-Pin; Special care must be taken during installation to prevent damage and obtain proper electrical contact; Prior to installation pull plunger to full extension, use and apply lubricant to plunger. Keep pedal in up position.; Push switch in and seat into opening pressing against pedal. Once seated secure switch by turning it to the right approximately 45 degrees.; This action turns the plunger shoe into the correct position to make contacts operate. 1J0945511A, 1J0945511B, 1J0945511D, URO012812 |
JETTA
1.8L L4 Turbocharged
| 2002 |
4-Pin; Special care must be taken during installation to prevent damage and obtain proper electrical contact; Prior to installation pull plunger to full extension, use and apply lubricant to plunger. Keep pedal in up position.; Push switch in and seat into opening pressing against pedal. Once seated secure switch by turning it to the right approximately 45 degrees.; This action turns the plunger shoe into the correct position to make contacts operate. 1J0945511A, 1J0945511B, 1J0945511D, URO012812 |
| 2003 |
4-Pin; Special care must be taken during installation to prevent damage and obtain proper electrical contact; Prior to installation pull plunger to full extension, use and apply lubricant to plunger. Keep pedal in up position.; Push switch in and seat into opening pressing against pedal. Once seated secure switch by turning it to the right approximately 45 degrees.; This action turns the plunger shoe into the correct position to make contacts operate. 1J0945511A, 1J0945511B, 1J0945511D, URO012812 |
| 2004 |
4-Pin; Special care must be taken during installation to prevent damage and obtain proper electrical contact; Prior to installation pull plunger to full extension, use and apply lubricant to plunger. Keep pedal in up position.; Push switch in and seat into opening pressing against pedal. Once seated secure switch by turning it to the right approximately 45 degrees.; This action turns the plunger shoe into the correct position to make contacts operate. 1J0945511A, 1J0945511B, 1J0945511D, URO012812 |
| 2005 |
4-Pin; Special care must be taken during installation to prevent damage and obtain proper electrical contact; Prior to installation pull plunger to full extension, use and apply lubricant to plunger. Keep pedal in up position.; Push switch in and seat into opening pressing against pedal. Once seated secure switch by turning it to the right approximately 45 degrees.; This action turns the plunger shoe into the correct position to make contacts operate. 1J0945511A, 1J0945511B, 1J0945511D, URO012812 |
1.9L L4 DIESEL Turbocharged
| 2002 |
4-Pin; Special care must be taken during installation to prevent damage and obtain proper electrical contact; Prior to installation pull plunger to full extension, use and apply lubricant to plunger. Keep pedal in up position.; Push switch in and seat into opening pressing against pedal. Once seated secure switch by turning it to the right approximately 45 degrees.; This action turns the plunger shoe into the correct position to make contacts operate. 1J0945511A, 1J0945511B, 1J0945511D, URO012812 |
| 2003 |
4-Pin; Special care must be taken during installation to prevent damage and obtain proper electrical contact; Prior to installation pull plunger to full extension, use and apply lubricant to plunger. Keep pedal in up position.; Push switch in and seat into opening pressing against pedal. Once seated secure switch by turning it to the right approximately 45 degrees.; This action turns the plunger shoe into the correct position to make contacts operate. 1J0945511A, 1J0945511B, 1J0945511D, URO012812 |
| 2004 |
4-Pin; Special care must be taken during installation to prevent damage and obtain proper electrical contact; Prior to installation pull plunger to full extension, use and apply lubricant to plunger. Keep pedal in up position.; Push switch in and seat into opening pressing against pedal. Once seated secure switch by turning it to the right approximately 45 degrees.; This action turns the plunger shoe into the correct position to make contacts operate. 1J0945511A, 1J0945511B, 1J0945511D, URO012812 |
| 2005 |
4-Pin; Special care must be taken during installation to prevent damage and obtain proper electrical contact; Prior to installation pull plunger to full extension, use and apply lubricant to plunger. Keep pedal in up position.; Push switch in and seat into opening pressing against pedal. Once seated secure switch by turning it to the right approximately 45 degrees.; This action turns the plunger shoe into the correct position to make contacts operate. 1J0945511A, 1J0945511B, 1J0945511D, URO012812 |
2.0L L4
| 2002 |
4-Pin; Special care must be taken during installation to prevent damage and obtain proper electrical contact; Prior to installation pull plunger to full extension, use and apply lubricant to plunger. Keep pedal in up position.; Push switch in and seat into opening pressing against pedal. Once seated secure switch by turning it to the right approximately 45 degrees.; This action turns the plunger shoe into the correct position to make contacts operate. 1J0945511A, 1J0945511B, 1J0945511D, URO012812 |
| 2003 |
4-Pin; Special care must be taken during installation to prevent damage and obtain proper electrical contact; Prior to installation pull plunger to full extension, use and apply lubricant to plunger. Keep pedal in up position.; Push switch in and seat into opening pressing against pedal. Once seated secure switch by turning it to the right approximately 45 degrees.; This action turns the plunger shoe into the correct position to make contacts operate. 1J0945511A, 1J0945511B, 1J0945511D, URO012812 |
| 2004 |
4-Pin; Special care must be taken during installation to prevent damage and obtain proper electrical contact; Prior to installation pull plunger to full extension, use and apply lubricant to plunger. Keep pedal in up position.; Push switch in and seat into opening pressing against pedal. Once seated secure switch by turning it to the right approximately 45 degrees.; This action turns the plunger shoe into the correct position to make contacts operate. 1J0945511A, 1J0945511B, 1J0945511D, URO012812 |
| 2005 |
4-Pin; Special care must be taken during installation to prevent damage and obtain proper electrical contact; Prior to installation pull plunger to full extension, use and apply lubricant to plunger. Keep pedal in up position.; Push switch in and seat into opening pressing against pedal. Once seated secure switch by turning it to the right approximately 45 degrees.; This action turns the plunger shoe into the correct position to make contacts operate. 1J0945511A, 1J0945511B, 1J0945511D, URO012812 |
2.5L L5
| 2005 |
4-Pin; Special care must be taken during installation to prevent damage and obtain proper electrical contact; Prior to installation pull plunger to full extension, use and apply lubricant to plunger. Keep pedal in up position.; Push switch in and seat into opening pressing against pedal. Once seated secure switch by turning it to the right approximately 45 degrees.; This action turns the plunger shoe into the correct position to make contacts operate. 1J0945511A, 1J0945511B, 1J0945511D, URO012812 |
2.8L V6
| 2003 |
4-Pin; Special care must be taken during installation to prevent damage and obtain proper electrical contact; Prior to installation pull plunger to full extension, use and apply lubricant to plunger. Keep pedal in up position.; Push switch in and seat into opening pressing against pedal. Once seated secure switch by turning it to the right approximately 45 degrees.; This action turns the plunger shoe into the correct position to make contacts operate. 1J0945511A, 1J0945511B, 1J0945511D, URO012812 |
| 2004 |
4-Pin; Special care must be taken during installation to prevent damage and obtain proper electrical contact; Prior to installation pull plunger to full extension, use and apply lubricant to plunger. Keep pedal in up position.; Push switch in and seat into opening pressing against pedal. Once seated secure switch by turning it to the right approximately 45 degrees.; This action turns the plunger shoe into the correct position to make contacts operate. 1J0945511A, 1J0945511B, 1J0945511D, URO012812 |
2.8L V6 DOHC
| 2002 |
4-Pin; Special care must be taken during installation to prevent damage and obtain proper electrical contact; Prior to installation pull plunger to full extension, use and apply lubricant to plunger. Keep pedal in up position.; Push switch in and seat into opening pressing against pedal. Once seated secure switch by turning it to the right approximately 45 degrees.; This action turns the plunger shoe into the correct position to make contacts operate. 1J0945511A, 1J0945511B, 1J0945511D, URO012812 |
2.8L V6 SOHC
| 2002 |
4-Pin; Special care must be taken during installation to prevent damage and obtain proper electrical contact; Prior to installation pull plunger to full extension, use and apply lubricant to plunger. Keep pedal in up position.; Push switch in and seat into opening pressing against pedal. Once seated secure switch by turning it to the right approximately 45 degrees.; This action turns the plunger shoe into the correct position to make contacts operate. 1J0945511A, 1J0945511B, 1J0945511D, URO012812 |
TOUAREG
3.2L V6
| 2004 |
4-Pin; Special care must be taken during installation to prevent damage and obtain proper electrical contact; Prior to installation pull plunger to full extension, use and apply lubricant to plunger. Keep pedal in up position.; Push switch in and seat into opening pressing against pedal. Once seated secure switch by turning it to the right approximately 45 degrees.; This action turns the plunger shoe into the correct position to make contacts operate. 1J0945511A, 1J0945511B, 1J0945511D, URO012812 |
| 2005 |
4-Pin; Special care must be taken during installation to prevent damage and obtain proper electrical contact; Prior to installation pull plunger to full extension, use and apply lubricant to plunger. Keep pedal in up position.; Push switch in and seat into opening pressing against pedal. Once seated secure switch by turning it to the right approximately 45 degrees.; This action turns the plunger shoe into the correct position to make contacts operate. 1J0945511A, 1J0945511B, 1J0945511D, URO012812 |
4.2L V8
| 2004 |
4-Pin; Special care must be taken during installation to prevent damage and obtain proper electrical contact; Prior to installation pull plunger to full extension, use and apply lubricant to plunger. Keep pedal in up position.; Push switch in and seat into opening pressing against pedal. Once seated secure switch by turning it to the right approximately 45 degrees.; This action turns the plunger shoe into the correct position to make contacts operate. 1J0945511A, 1J0945511B, 1J0945511D, URO012812 |
| 2005 |
4-Pin; Special care must be taken during installation to prevent damage and obtain proper electrical contact; Prior to installation pull plunger to full extension, use and apply lubricant to plunger. Keep pedal in up position.; Push switch in and seat into opening pressing against pedal. Once seated secure switch by turning it to the right approximately 45 degrees.; This action turns the plunger shoe into the correct position to make contacts operate. 1J0945511A, 1J0945511B, 1J0945511D, URO012812 |
4.9L V10 DIESEL Turbocharged
| 2004 |
4-Pin; Special care must be taken during installation to prevent damage and obtain proper electrical contact; Prior to installation pull plunger to full extension, use and apply lubricant to plunger. Keep pedal in up position.; Push switch in and seat into opening pressing against pedal. Once seated secure switch by turning it to the right approximately 45 degrees.; This action turns the plunger shoe into the correct position to make contacts operate. 1J0945511A, 1J0945511B, 1J0945511D, URO012812 |
5.0L V10 DIESEL Turbocharged
| 2007 |
4-Pin; Special care must be taken during installation to prevent damage and obtain proper electrical contact; Prior to installation pull plunger to full extension, use and apply lubricant to plunger. Keep pedal in up position.; Push switch in and seat into opening pressing against pedal. Once seated secure switch by turning it to the right approximately 45 degrees.; This action turns the plunger shoe into the correct position to make contacts operate. 1J0945511A, 1J0945511B, 1J0945511D, URO012812 |
| 2008 |
4-Pin; Special care must be taken during installation to prevent damage and obtain proper electrical contact; Prior to installation pull plunger to full extension, use and apply lubricant to plunger. Keep pedal in up position.; Push switch in and seat into opening pressing against pedal. Once seated secure switch by turning it to the right approximately 45 degrees.; This action turns the plunger shoe into the correct position to make contacts operate. 1J0945511A, 1J0945511B, 1J0945511D, URO012812 |
AUDI
TT
1.8L L4 Turbocharged
| 2002 |
4-Pin; Special care must be taken during installation to prevent damage and obtain proper electrical contact; Prior to installation pull plunger to full extension, use and apply lubricant to plunger. Keep pedal in up position.; Push switch in and seat into opening pressing against pedal. Once seated secure switch by turning it to the right approximately 45 degrees.; This action turns the plunger shoe into the correct position to make contacts operate. 1J0945511A, 1J0945511B, 1J0945511D, URO012812 |
| 2003 |
4-Pin; Special care must be taken during installation to prevent damage and obtain proper electrical contact; Prior to installation pull plunger to full extension, use and apply lubricant to plunger. Keep pedal in up position.; Push switch in and seat into opening pressing against pedal. Once seated secure switch by turning it to the right approximately 45 degrees.; This action turns the plunger shoe into the correct position to make contacts operate. 1J0945511A, 1J0945511B, 1J0945511D, URO012812 |
| 2004 |
4-Pin; Special care must be taken during installation to prevent damage and obtain proper electrical contact; Prior to installation pull plunger to full extension, use and apply lubricant to plunger. Keep pedal in up position.; Push switch in and seat into opening pressing against pedal. Once seated secure switch by turning it to the right approximately 45 degrees.; This action turns the plunger shoe into the correct position to make contacts operate. 1J0945511A, 1J0945511B, 1J0945511D, URO012812 |
| 2005 |
4-Pin; Special care must be taken during installation to prevent damage and obtain proper electrical contact; Prior to installation pull plunger to full extension, use and apply lubricant to plunger. Keep pedal in up position.; Push switch in and seat into opening pressing against pedal. Once seated secure switch by turning it to the right approximately 45 degrees.; This action turns the plunger shoe into the correct position to make contacts operate. 1J0945511A, 1J0945511B, 1J0945511D, URO012812 |
| 2006 |
4-Pin; Special care must be taken during installation to prevent damage and obtain proper electrical contact; Prior to installation pull plunger to full extension, use and apply lubricant to plunger. Keep pedal in up position.; Push switch in and seat into opening pressing against pedal. Once seated secure switch by turning it to the right approximately 45 degrees.; This action turns the plunger shoe into the correct position to make contacts operate. 1J0945511A, 1J0945511B, 1J0945511D, URO012812 |
3.2L V6
| 2004 |
4-Pin; Special care must be taken during installation to prevent damage and obtain proper electrical contact; Prior to installation pull plunger to full extension, use and apply lubricant to plunger. Keep pedal in up position.; Push switch in and seat into opening pressing against pedal. Once seated secure switch by turning it to the right approximately 45 degrees.; This action turns the plunger shoe into the correct position to make contacts operate. 1J0945511A, 1J0945511B, 1J0945511D, URO012812 |
| 2005 |
4-Pin; Special care must be taken during installation to prevent damage and obtain proper electrical contact; Prior to installation pull plunger to full extension, use and apply lubricant to plunger. Keep pedal in up position.; Push switch in and seat into opening pressing against pedal. Once seated secure switch by turning it to the right approximately 45 degrees.; This action turns the plunger shoe into the correct position to make contacts operate. 1J0945511A, 1J0945511B, 1J0945511D, URO012812 |
| 2006 |
4-Pin; Special care must be taken during installation to prevent damage and obtain proper electrical contact; Prior to installation pull plunger to full extension, use and apply lubricant to plunger. Keep pedal in up position.; Push switch in and seat into opening pressing against pedal. Once seated secure switch by turning it to the right approximately 45 degrees.; This action turns the plunger shoe into the correct position to make contacts operate. 1J0945511A, 1J0945511B, 1J0945511D, URO012812 |
参考号
| 厂商 | 号码 |
|---|---|
| OE | 1J0945511* |
| 厂商 | 号码 |
|---|---|
| OE | 1J0945511* |
| 厂商 | 号码 |
|---|---|
| OE | 1J0945511* |
OE号码
| 品牌 | 号码 |
|---|---|
| ÜRO P | URO-01281* |
版权所有 © 2008-2017 宜配网-全球专业汽车零配件查询平台门户网站 粤ICP备08123151号 增值电信业务经营许可证:粤B2-20080289
未经授权禁止转载、摘编、复制或建立镜像.如有违反,必追究法律责任 免责声明

联系客服
客服电话:020-36390347